Common HTML Mistakes Beginners Make (and How to Spot Them in Minutes)
Hypertext Markup Language (HTML) is a markup language used in web development to display information on webpages. It helps developers structure content on webpages. It seamlessly works with technologies like Cascading Style Sheets (CSS) and JavaScript to improve the web design experience.
However, beginners can make HTML mistakes when writing or editing the code because of a single missing element or an incorrect sequence. For instance, opening a paragraph with <p> but failing to close it with </p>.
This is why it’s important to know about possible mistakes and how you can identify them. So, without any further ado, let’s get right into it.
Common HTML Errors Beginners Make
Coding errors are unavoidable in website development. You can use technology to minimize the effort or speed up the process. Here are the common HTML errors beginners usually make:
Unclosed HTML Tags
Forgetting to close HTML tags is one of the common syntax errors in coding. When a developer omits a required closing tag, the browser may interpret the surrounding markup differently than intended. This can lead to unexpected page structure or layout issues.
We’ll show you both unclosed and closed HTML tags to help you understand the difference.
Incorrect:
<a href="https://example.com">Example Website
You can see in the above-mentioned hyperlink code that it does not have the closing tag.
Correct:
<a href="https://example.com">Example Website</a>
Now, the hyperlink code will properly work wherever it is inserted. So, make sure you close all the HTML tags you opened during coding.
Wrong Tags Nesting
One of the mistakes beginners make is that they don’t close HTML tags in the correct manner. These tags are supposed to be closed in the reverse order that they were opened.
Failing to nest tags accurately would cause an invalid HTML code error. Experienced web developers could easily spot this error. However, beginners may need to look at each code element to find the mistake. Let’s take a look at an example of wrong tag nesting:
Incorrect:
<p>My name is<strong>John</p></strong>
The above-mentioned HTML code has a sequence issue. The tags need to be closed in the reverse order.
Correct:
<p>My name is <strong>John</strong></p>
In the corrected version, you can see the <strong> tag is closed before the <p> tag, which is the correct order.
Using Incorrect Heading Hierarchy
The H1 tag is the page headline element that represents the topic of the page. Beginners usually use heading tags incorrectly because they are not aware of the heading hierarchy. Using <h4> tags without <h3> is not automatically an HTML error, but a clear heading hierarchy helps users and assistive technologies understand the page structure.
Incorrect:
<h1>Welcome to our website</h1>
<h1>What we do</h1>
Correct:
<h1>Welcome to our website</h1>
<h2>What we do</h2>
The <h1> tag is typically followed by <h2>, then <h3>, and so on, according to the heading hierarchy.
Using Inline CSS Styles
CSS is used in web development to control the appearance and layout of webpages. Styles can be written in a separate stylesheet or included directly in HTML. It contains all the rules for the website text formatting, such as fonts, colors, and other elements.
Beginner HTML website builders make the mistake of adding stylesheet attributes to the HTML code, which makes the entire page’s code cluttered. The problem gets bigger when a large website is built this way. Therefore, this HTML mistake should be avoided.
Incorrect:
<p style="color: red; font-size: 20px;">Hello Guys</p>
Correct:
<p class="alert-text">Hello Guys</p>
Make sure you give your element a class and make the required changes in the design inside a CSS stylesheet. The mistake of using an inline CSS stylesheet is what most beginners make.
Neglecting Image Alt Tags
Image alt tags are an essential on-page SEO element that helps in optimizing the website images for appearing in search engines. Writing accurate, descriptive alt text helps make images accessible and can help search engines understand their content.
Forgetting or ignoring image alt tags means you’re missing out on the potential high rankings and organic traffic opportunities.
Incorrect:
<img src="golden-retriever.jpg" width="800" height="600">
Correct:
<img src="golden-retriever.jpg" alt="Golden retriever puppy sitting on a beautiful green lawn and loving life" width="800" height="600">
Missing the Doctype Declaration
A missing <!DOCTYPE html> declaration can cause web browsers to render page elements differently than expected. When there is no proper doctype declaration, web browsers may enter Quirks Mode. As a result, visitors may notice unexpected layout behavior, broken CSS styling, and inconsistent display across different web browsers.
Incorrect:
<html>
<head>
<title>Broken Layout Website</title>
</head>
<body>
<h1>This page renders in Quirks Mode</h1>
<p>Layouts, padding, and modern CSS grid/flexbox properties may display incorrectly.</p>
</body>
</html>
Correct:
<!DOCTYPE html>
<html lang="en">
<head>
<meta charset="UTF-8">
<meta name="viewport" content="width=device-width, initial-scale=1.0">
<title>Broken Layout Website</title>
</head>
<body>
<h1>This page renders in Standards Mode</h1>
<p>CSS layouts and modern web features will display consistently across all browsers.</p>
</body>
</html>
How Beginners Can Quickly Identify HTML Errors in Their Code
Identifying errors in HTML code might be easier for expert web developers. However, beginners may struggle to find them.
This is where HTML validators come in. These are web-based tools that highlight errors in the HTML code and help developers fix them.
Several HTML validators are available on the internet. You can pick any tool that best suits your requirements. For demonstration, we selected HTML validator and tested it with some code.
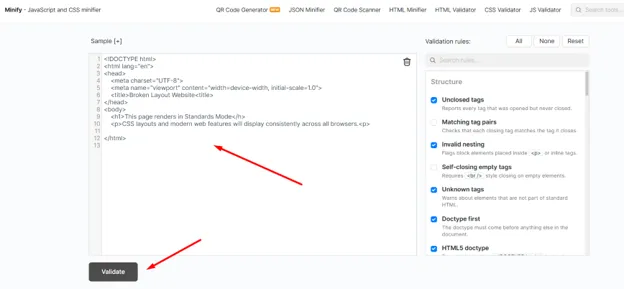
We pasted the HTML code into the input field. You can also upload a file or provide a URL. After pressing the “Validate” button, it took a couple of seconds to give the result.
Here’s the result:
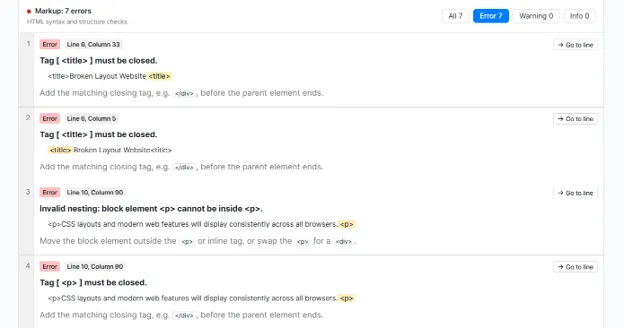
This HTML validator highlighted several HTML errors in the code within a second.
This makes it a lot easier to find and fix HTML errors.
Plus, adding the HTML validation tool to your workflow can improve your coding skills and make your web development process faster.
Wrapping Up
Writing HTML code has become significantly easier than before. Nowadays, web developers have access to several free and secure website development tools, which makes the job much faster. One of the examples is the HTML code validation as discussed in the blog post.
The purpose of this blog post is to highlight some common HTML mistakes beginners make and provide them with quick fixes to help them write better code.
Frequently Asked Questions
What are the most common HTML mistakes beginners make?
How can I check if my HTML code has errors?
What happens if I forget to close an HTML tag?
Is incorrect HTML nesting bad for SEO?
Why is the DOCTYPE declaration important in HTML?
Do image alt attributes help with SEO?
What is the best free tool to validate HTML code?
Is using inline CSS an HTML mistake?
About Author: